How to Install a Fireplace Blower: Complete DIY Guide
Boost heat output by 50%+ with a fireplace blower. Step‑by‑step wiring, safety, tools, and cost breakdown — everything you need to install like a pro.
🔥 Why install a fireplace blower? A blower (or fan kit) captures heat from the firebox and pushes warm air into your room instead of letting it escape up the chimney. This simple upgrade can increase heating efficiency by up to 80%, reduce fuel costs, and make your gas fireplace or wood fireplace truly effective as a supplemental heat source. Whether you're handy or hiring a pro, this guide gives you the complete picture — from choosing the right kit to final testing.
Fireplace Blower Installation Snapshot
| Item | Estimated Cost |
|---|---|
| DIY blower kit (universal or brand-specific) | $80–$250 |
| Professional installation | $200–$500+ |
| DIY tools (if you don’t own them) | $20–$60 |
| Annual energy savings (compared to no blower) | 15–30% on heating bills |
| Average installation time (DIY) | 1.5 – 3 hours |
Step‑by‑Step Blower Installation (DIY)
Before starting, confirm that your fireplace model supports a blower. Most gas fireplaces and many fireplace inserts have a designated cavity and wiring access. If you own a wall fireplace or standalone unit, check the manual for “blower ready” spec.
Safety First – Disconnect Gas & Electricity
Turn off the gas supply valve (usually located near the fireplace). Then unplug the unit if it's electric-start, or switch off the corresponding circuit breaker. Use a voltage tester on any exposed wires to confirm zero current. Never skip this — it protects you from shocks and gas leaks.
Remove Front Panels, Glass, and Logs
Carefully detach the fireplace front, glass door assembly, and any decorative media (logs, stones, or fireplace surround elements). Place them on a soft surface. Then remove the lower access panel or louver — this reveals the cavity beneath the firebox where the blower lives.
Install the Blower Assembly
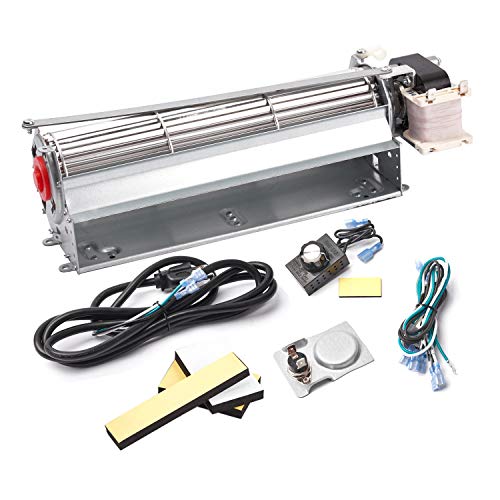
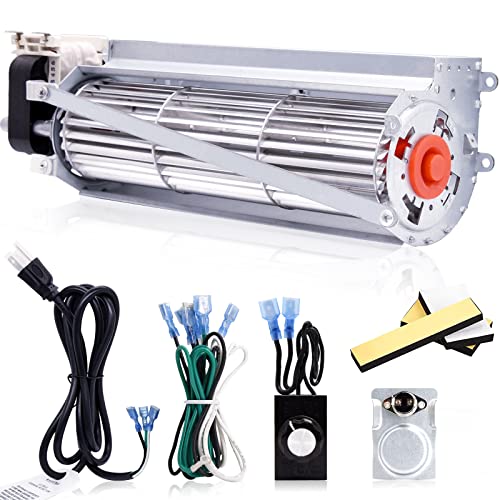
Position the blower into the designated compartment (most gas fireplaces have a marked area). Align mounting holes and secure with screws provided in your kit. Ensure the blower’s intake and exhaust face the correct direction — usually the fan pulls cool air from the bottom and pushes warm air forward into the room. Double-check that no wiring or insulation blocks the fan blades.
Connect Wiring – Junction Box or Rheostat
Locate the fireplace’s wiring junction box or pre-installed receptacle. Most blower kits include a snap-disc thermostat (auto on/off based on heat) and a variable speed controller. Match wires by color: black (hot) to black, white (neutral) to white, green or bare (ground) to grounding screw. Use wire nuts and electrical tape for secure splices. If you’re unsure, consult a licensed electrician — incorrect wiring can damage the fireplace blower fan.
Test Operation & Reassemble
Before fully reassembling, restore power (turn breaker back on or plug in). Turn on the gas and light your gas fireplace as usual. Let it heat for 5–10 minutes. The snap-disc should engage and the blower will start automatically (or use manual speed switch). Verify the fan blows warm air. If no operation, double-check wiring polarity and snap-disc placement. Once working, reinstall logs, glass, and front panels.
Blower vs Fan: What’s the Difference?
People often use these terms interchangeably, but there’s a nuance: a fireplace blower is a centrifugal fan designed to move large volumes of air through a heat exchanger, providing focused heating. A standard circulating fan might simply push room air without optimal heat capture. For maximum efficiency, choose a genuine blower kit made for your fireplace model. This is especially critical if you own a ventless fireplace, which relies on air circulation to prevent overheating.
1. Wrong blower size – Too small won’t move enough air; too large can cause overheating and thermal switch cycling.
2. Ignoring polarity – Reversing neutral/hot can burn out the fan motor.
3. Blocking vents – After installation, ensure lower and upper grilles are unobstructed to maintain airflow.
DIY vs. Pro Installation
While many homeowners can successfully install a fireplace blower DIY, you should call a professional if your fireplace lacks a pre-wired junction box, requires modifications to the firebox, or if you feel uncomfortable with electrical work. A certified technician typically charges $200–$500 and guarantees safe, code-compliant installation. Remember: an incorrectly installed blower can void your fireplace warranty or create a fire hazard.
Maintaining Your Blower for Longevity
Once installed, follow these fireplace maintenance tips: clean blower blades and housing every 6 months (vacuum dust), check wiring connections annually, and test the snap-disc before each heating season. A well-maintained fireplace blower accessory can last 10+ years and keep your room cozy without wasted heat.
If you’re also planning to upgrade other parts of your setup, explore related guides: fireplace inserts for older masonry units, gas fireplace maintenance to keep everything running smoothly, or even remodeling fireplace ideas to refresh your entire hearth. For homeowners considering a new system, compare gas vs electric fireplace efficiency to see which blower option fits your needs.
Ready to boost your fireplace heat? Installing a blower is one of the highest‑ROI home improvements. The warmth stays in your living room instead of the chimney — cutting energy bills while making your space more comfortable. Choose the correct kit, follow this guide step by step, and enjoy a toasty, efficient fireplace all winter.