
DIY Fireplace Surround: Complete Building Guide
Transform your fireplace with a custom-built surround using our comprehensive guide with step-by-step instructions
EXPLORE MATERIALSA fireplace surround serves as the decorative frame that enhances the visual appeal of your fireplace while protecting the surrounding walls from heat damage. Building your own DIY fireplace surround not only saves money compared to professional installation but also allows you to create a custom look that perfectly matches your home's aesthetic.
Whether you're looking to update an outdated fireplace remodel or adding character to a new installation, this comprehensive guide will walk you through everything you need to know about creating a stunning fireplace surround. From selecting the right materials to mastering installation techniques, we'll help you achieve professional results without the professional price tag.

Understanding Fireplace Surrounds
A fireplace surround is the decorative frame that surrounds the fireplace opening, typically extending from the mantel to the hearth. Unlike the fireplace mantel (the horizontal shelf above the fireplace) or the hearth (the floor area in front of the fireplace), the surround specifically refers to the vertical elements that frame the firebox.
Fireplace surrounds serve both aesthetic and functional purposes:
- Visual Enhancement: Creates a focal point in the room and adds architectural interest
- Heat Protection: Shields surrounding walls from heat damage and potential fire hazards
- Value Addition: A well-crafted surround can significantly increase your home's value
- Design Integration: Helps the fireplace blend with your room's overall design aesthetic
- Concealment: Hides gaps, imperfections, and construction elements around the fireplace opening

Choosing the Right Material for Your DIY Surround
The material you select for your fireplace surround will significantly impact both the installation process and the final appearance. Each option offers distinct advantages and considerations:
| Material | Cost Range | Difficulty Level | Heat Resistance | Best For |
|---|---|---|---|---|
| Wood | $200-$500 | Beginner-Intermediate | Requires clearance | Traditional, rustic, farmhouse styles |
| Marble | $500-$2,000+ | Advanced | Excellent | Elegant, formal, modern designs |
| Brick | $300-$800 | Intermediate | Excellent | Classic, industrial, traditional homes |
| Stone | $400-$1,200 | Intermediate-Advanced | Excellent | Rustic, lodge, Mediterranean styles |
| Tile | $150-$600 | Intermediate | Good (heat-rated tiles) | Modern, contemporary, colorful designs |
| MDF/Engineered Wood | $100-$300 | Beginner | Not recommended for heat exposure | Electric fireplaces only, budget projects |
Wood Surrounds
Wood surrounds offer warmth and character, making them popular for traditional fireplace designs. They're relatively easy to work with for DIYers but require proper clearance from the firebox to prevent fire hazards. For wood-burning or gas fireplaces, use hardwoods like oak, maple, or cherry that can withstand higher temperatures. For electric fireplaces, you have more flexibility as they don't generate as much heat.
Stone and Brick Surrounds
Natural stone and brick surrounds provide excellent heat resistance and a timeless appearance. While they require more specialized skills for installation, they offer exceptional durability and can last for generations. Consider DIY stone fireplace techniques using veneer stone panels for a more manageable project that still delivers the authentic look of natural stone.

Classic wood surround with natural finish
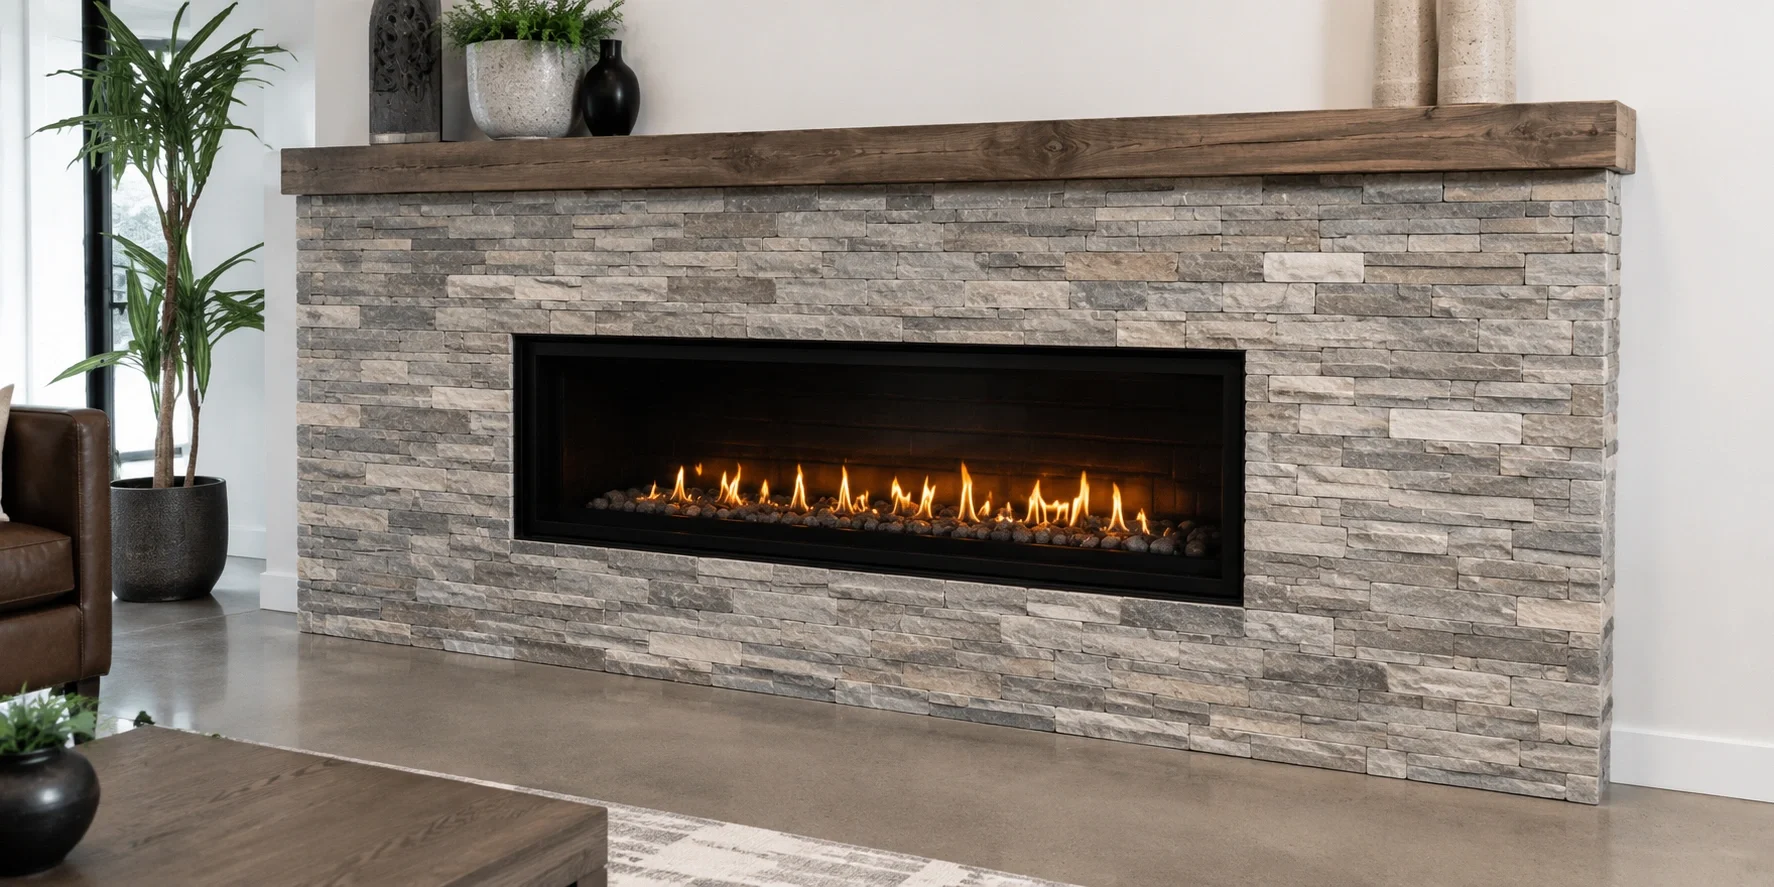
Modern stone veneer surround installation

Contemporary tile surround with geometric pattern
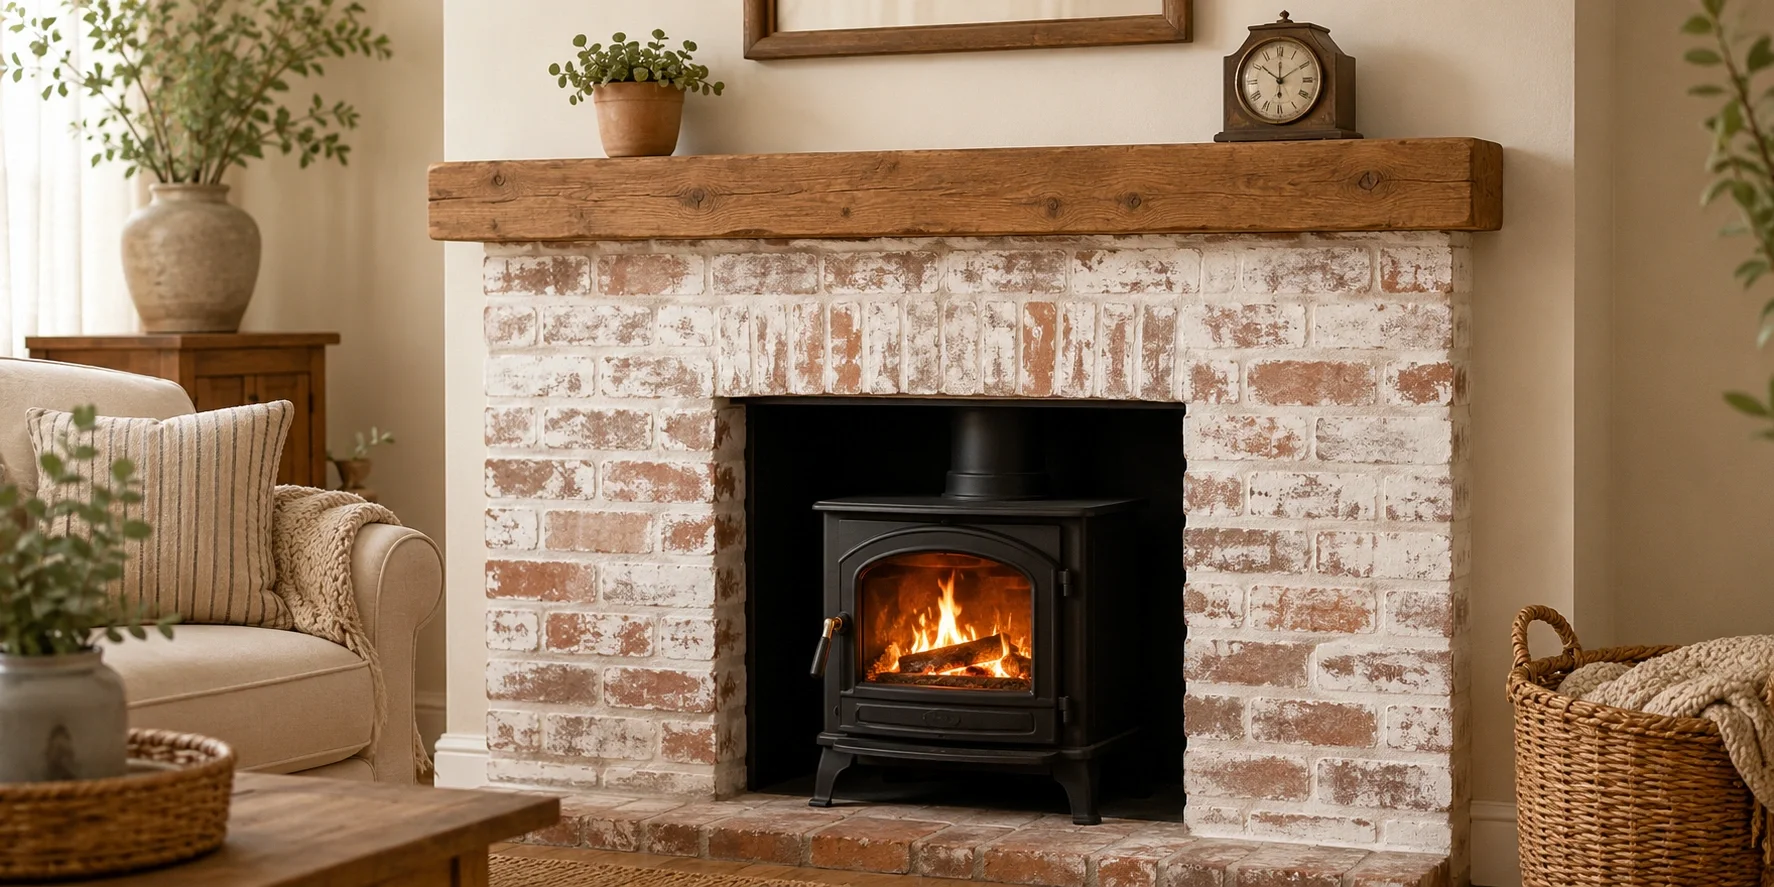
Whitewashed brick surround for farmhouse style
Essential Tools and Materials
Before starting your DIY fireplace surround project, gather these essential tools and materials. Having everything prepared in advance will streamline the installation process and help you achieve professional results.
Basic Tools Required
Measuring Tape
For precise measurements of your fireplace opening and surround dimensions
Level
Ensure your surround is perfectly plumb and level during installation
Drill/Driver
For creating pilot holes and driving screws into various materials
Circular Saw or Jigsaw
For cutting wood, MDF, or other materials to size
Nail Gun
Speeds up the installation process for wood surrounds
Caulk Gun
For applying adhesive and sealing gaps between materials
Safety Equipment
Goggles, dust mask, and work gloves for protection
Stud Finder
To locate wall studs for secure mounting of your surround
Additional Materials by Surround Type
- For Wood Surrounds: Wood boards (1×4, 1×6, or 1×8), wood glue, finish nails, wood filler, sandpaper (various grits), stain or paint
- For Stone/Brick Surrounds: Stone veneer or brick tiles, mortar mix, trowel, spacers, grout, sealer
- For Tile Surrounds: Tiles, tile adhesive, notched trowel, tile spacers, grout, grout sealer
- For All Types: Construction adhesive, shims, backer board (if needed), corner brackets, finish trim
Step-by-Step DIY Fireplace Surround Installation
This comprehensive guide focuses on building a wood surround, which is the most accessible option for DIY enthusiasts. The principles can be adapted for other materials with appropriate modifications.
Measure Your Fireplace Opening
Begin by taking precise measurements of your fireplace opening. Measure the width at the top, middle, and bottom, as well as the height on both sides, as fireplaces are often not perfectly square. Also measure the depth of the fireplace opening. These measurements will determine the dimensions of your surround components.
Pro Tip
Create a detailed sketch of your fireplace with all measurements noted. This will serve as your blueprint throughout the project and help when purchasing materials.
Design Your Surround
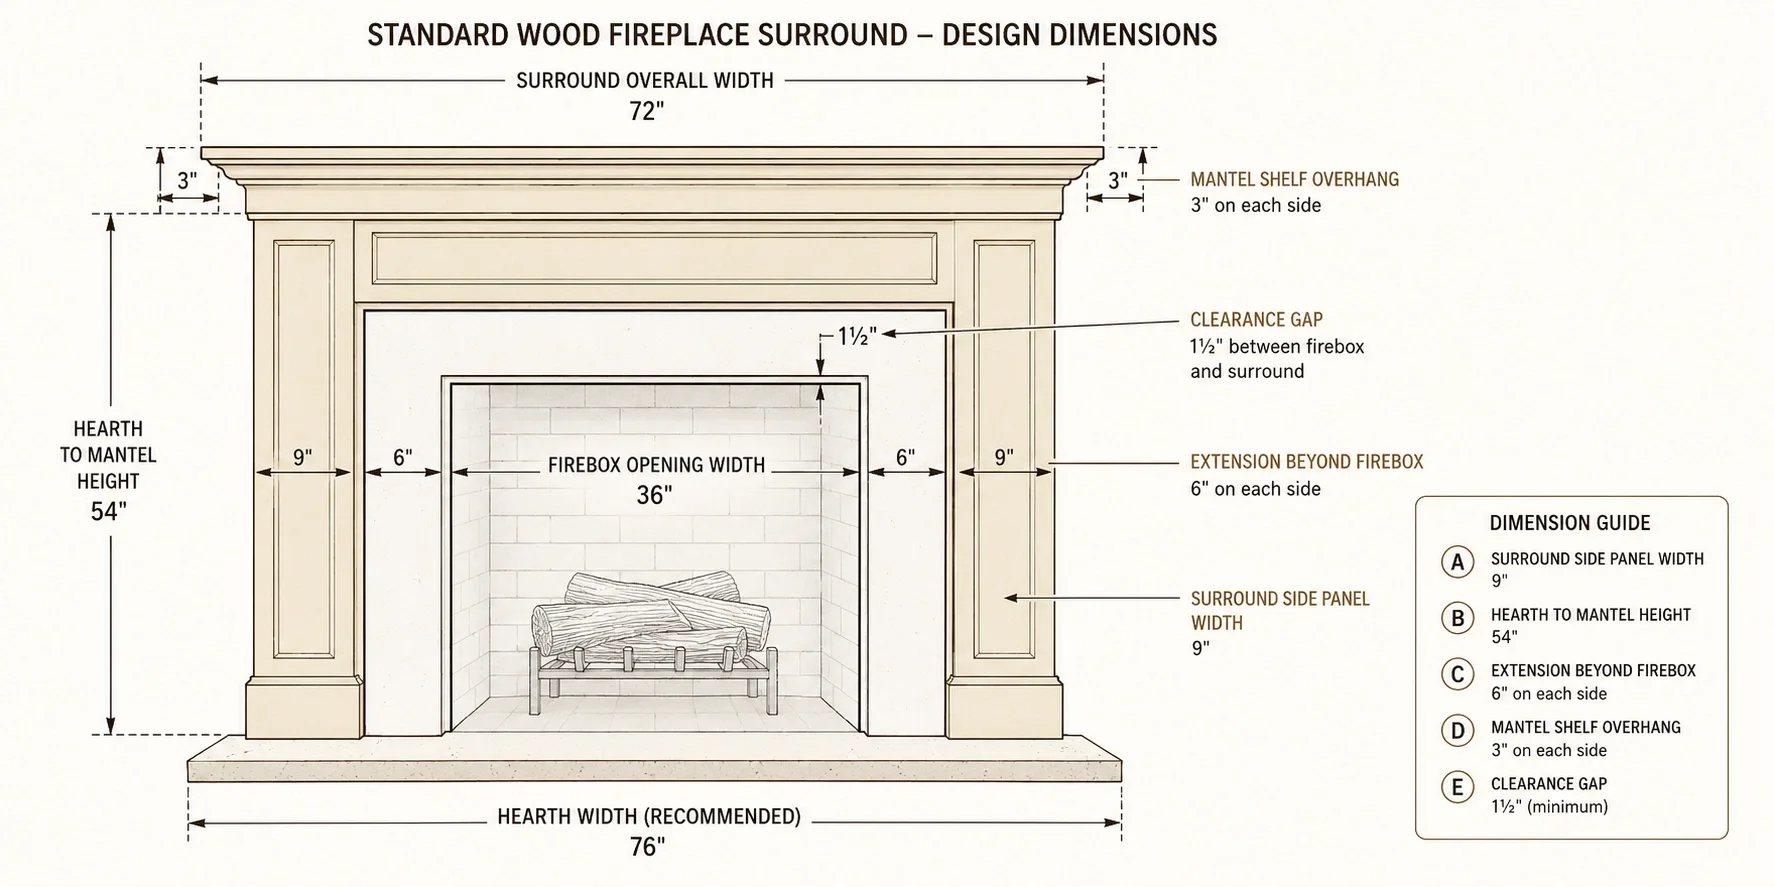
Based on your measurements, design your surround. Consider the style of your home and existing fireplace ideas when determining proportions. A typical surround extends 3-6 inches beyond the fireplace opening on each side and 12-18 inches above. The top piece (often integrated with or just below the mantel) should be proportionate to the overall size.
Prepare the Area
Clear the area around your fireplace and remove any existing surround materials. If you're working with a gas fireplace or wood-burning fireplace, ensure it's completely cool and turned off. Protect the floor and surrounding areas with drop cloths, and use painter's tape to mark the edges of your new surround.
Cut Your Materials to Size
Using your measurements and design, cut your wood pieces to size. You'll typically need two side pieces, a top piece, and potentially a bottom piece if your design includes one. For a more substantial look, consider building a frame using 2×4 lumber and then attaching your finish material to this frame.
Safety Warning
Always wear safety glasses and a dust mask when cutting wood or other materials. Follow all manufacturer safety guidelines for power tools.
Install a Backer Board (If Needed)
For certain materials like tile or stone, you'll need to install a cement backer board over the wall area where your surround will go. This provides a stable, fire-resistant surface for your finish materials. Cut the backer board to size and secure it to the wall studs using appropriate screws.
Install the Side Pieces
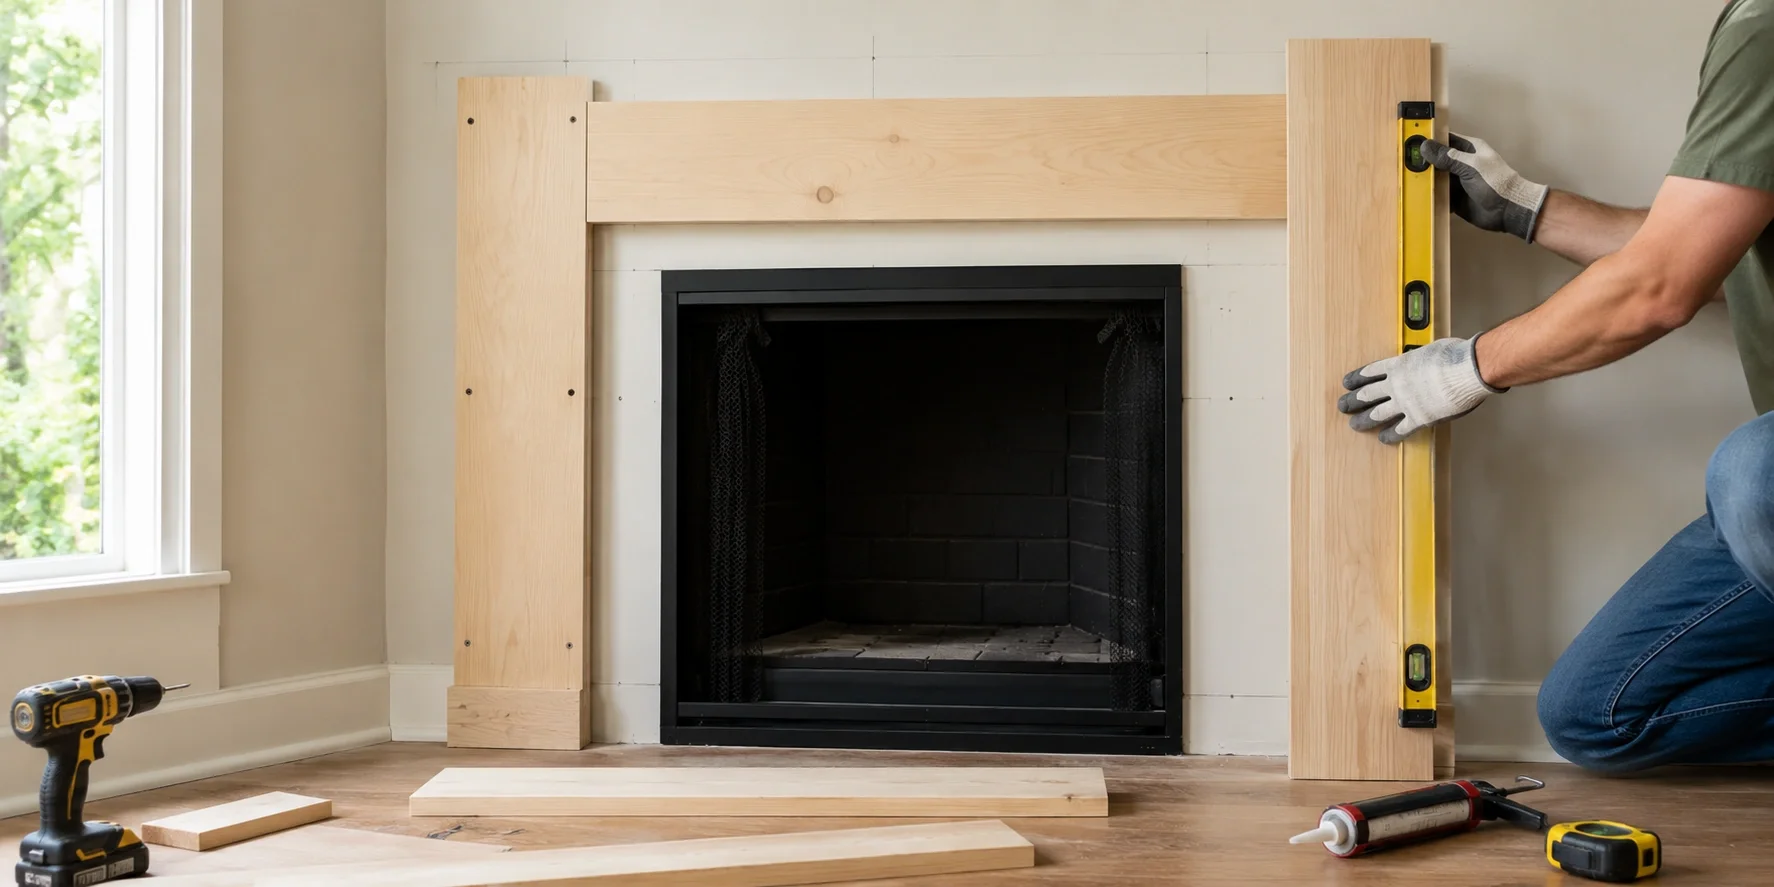
Begin installation with the side pieces. Use a level to ensure they're perfectly plumb. Attach them to the wall using construction adhesive and screws driven into wall studs. If you can't hit studs in all locations, use appropriate wall anchors. Leave a small gap (about 1/8 inch) between the surround and the fireplace opening to allow for expansion due to heat.
Install the Top Piece
Once the side pieces are secure, install the top piece. This should rest on top of the side pieces and be secured with both adhesive and screws. Use shims if necessary to ensure a level installation. If your design includes a mantel shelf, this would typically be installed above the top piece of the surround.
Add Trim and Finishing Details
Once the main components are installed, add any trim pieces, molding, or decorative elements according to your design. This might include crown molding at the top, base molding at the bottom, or decorative pilasters on the sides. These details can transform a simple surround into a stunning focal point.
Fill, Sand, and Finish
Fill any screw holes with wood filler and sand all surfaces smooth, starting with a coarser grit sandpaper and progressing to finer grits. Wipe away all dust with a tack cloth before applying your finish. You can stain the wood to highlight its natural beauty or paint it to match your room's color scheme.
Finishing Technique
For a professional-looking finish, apply at least two coats of stain or paint, sanding lightly between coats with fine-grit sandpaper. Finish with a clear protective topcoat to guard against heat and wear.
Seal Gaps and Add Caulking
Apply a high-temperature silicone caulk around the edges where the surround meets the fireplace opening. This creates a clean, finished look and helps prevent heat from getting behind the surround. Use a caulk smoothing tool or your finger (dipped in soapy water) to create a neat, uniform bead.
Cost Breakdown for DIY Fireplace Surround
One of the main advantages of a DIY approach is significant cost savings compared to professional installation. Here's a typical cost breakdown for a standard wood surround project:
For comparison, professional installation of a similar wood surround typically costs $800-$2,500, including materials and labor. More elaborate materials like natural stone or marble can cost $2,000-$5,000+ when professionally installed.
The exact cost of your project will depend on the materials you choose, the size of your fireplace, and whether you already own the necessary tools. Learn more about fireplace costs in our comprehensive guide.
Design Ideas for Your DIY Fireplace Surround
Your fireplace surround should complement your home's architectural style and your personal taste. Here are some popular design approaches to consider:
Modern Minimalist
For a minimalist fireplace look, opt for clean lines and simple proportions. A sleek surround with minimal detailing in a matte black or white finish can create a striking contemporary focal point. Consider using materials like concrete, metal accents, or high-gloss finishes for added sophistication.
Rustic Farmhouse
Embrace the warmth of a rustic fireplace with reclaimed wood, distressed finishes, or rough-hewn timber. A chunky wooden beam mantel paired with a simple wood surround can create authentic farmhouse charm. Consider adding subtle details like visible wood grain or hand-forged metal accents.
Classic Traditional
Traditional surrounds often feature more elaborate molding, pilasters, and architectural details. Consider using fluted columns, decorative crown molding, or carved details to create a formal, elegant look. White or cream painted wood surrounds are classic choices for traditional homes.
Industrial Chic
For an industrial aesthetic, consider combining materials like metal and reclaimed wood. A simple metal frame surround with exposed bolts and hardware can complement modern fireplace designs beautifully. Concrete or metal surrounds with minimal detailing also work well in industrial spaces.

Sleek modern surround with minimal detailing
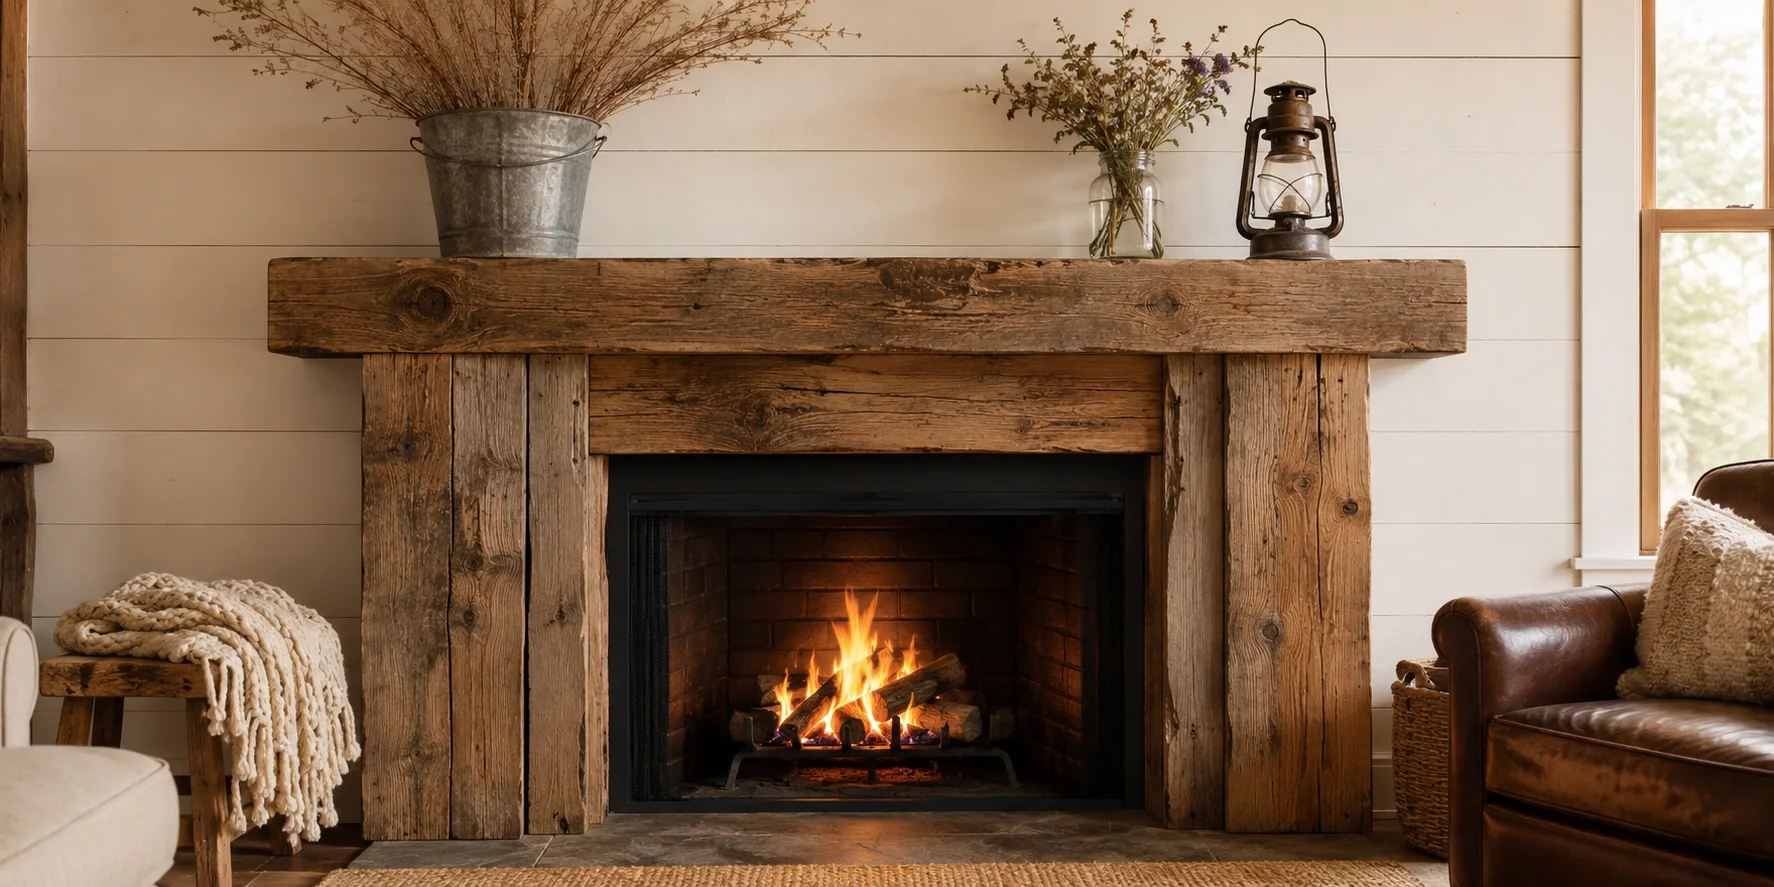
Reclaimed wood surround for farmhouse style
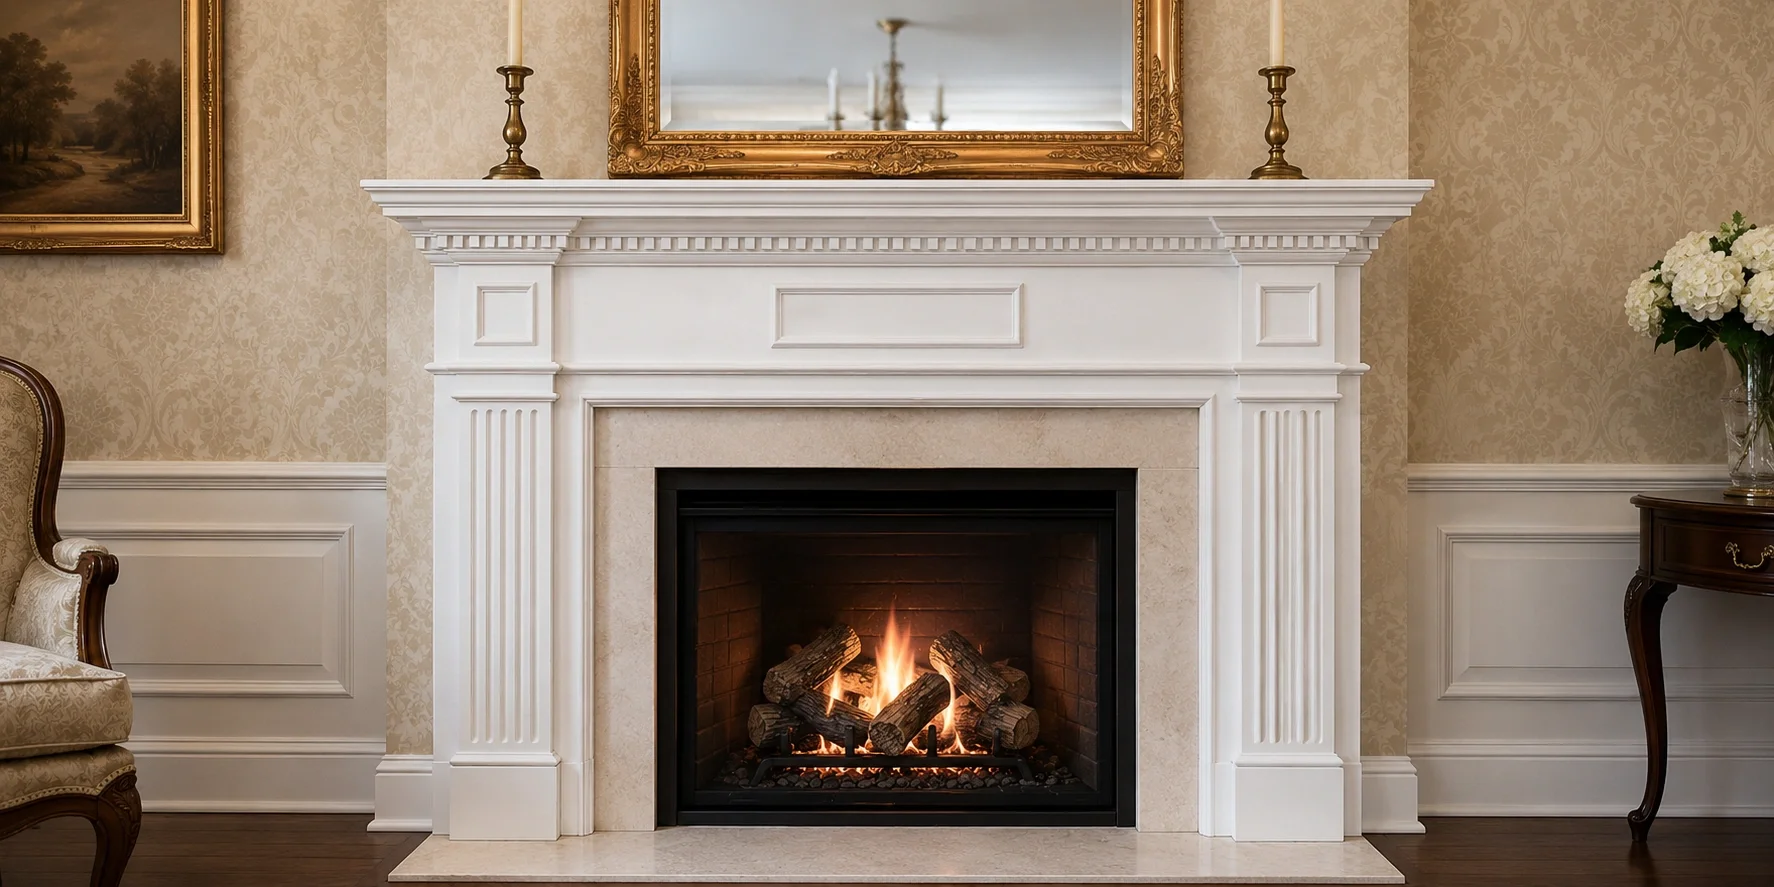
Classic surround with architectural moldings
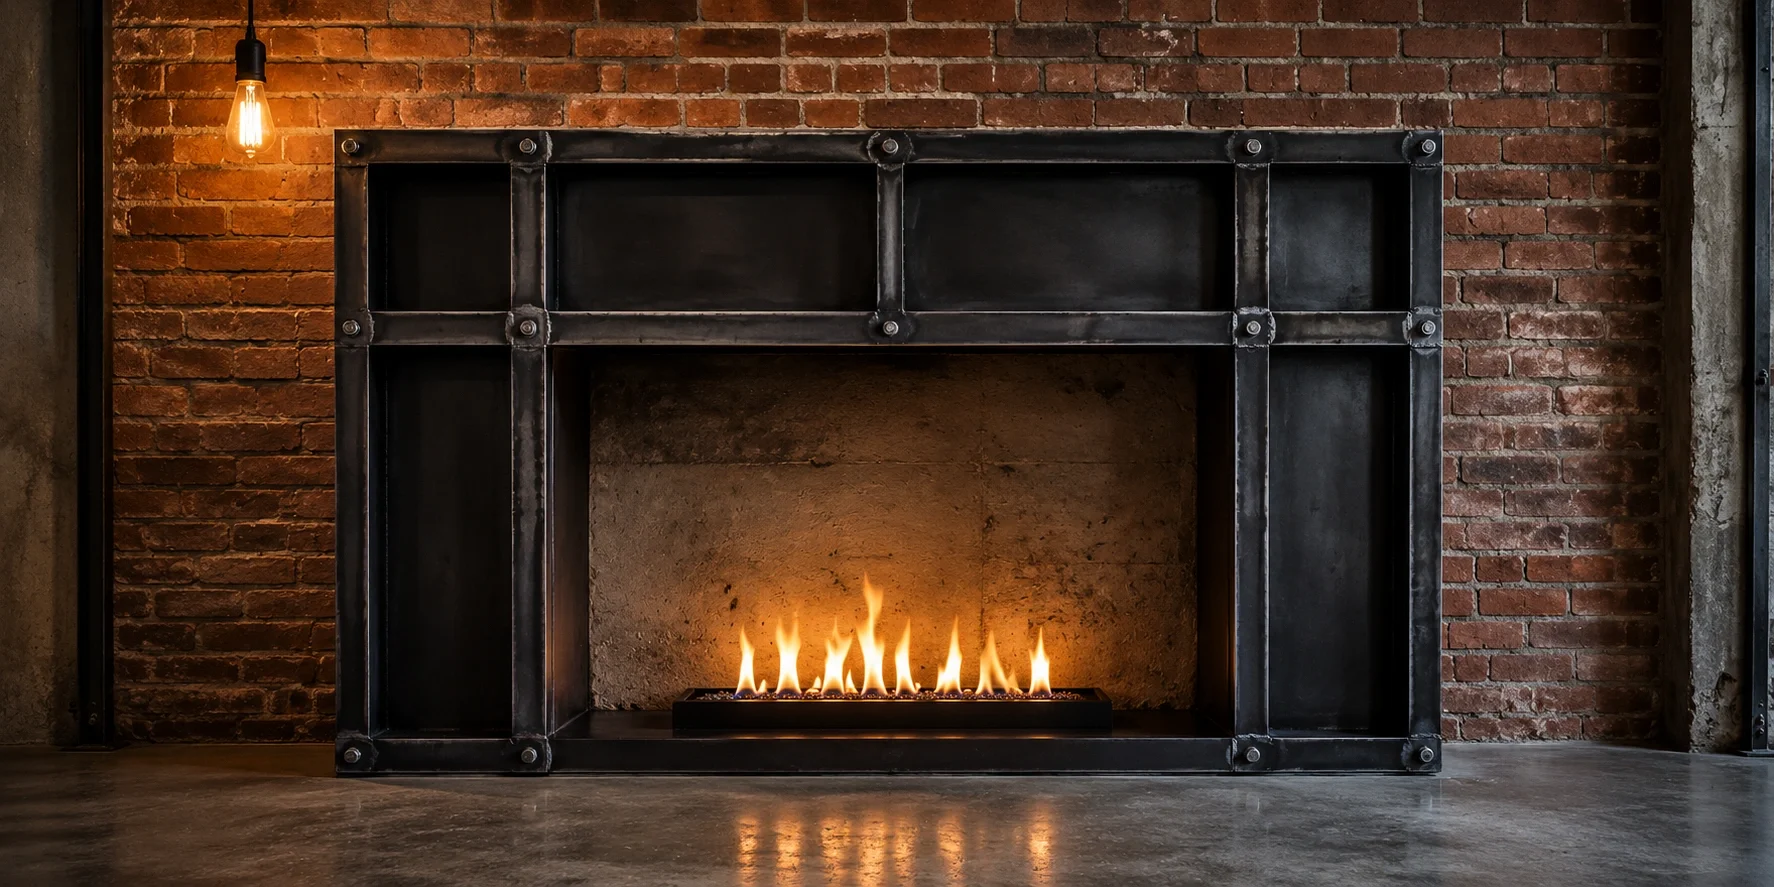
Industrial metal frame surround design
Important Safety Considerations
When building a fireplace surround, safety should be your top priority. Different fireplace types have specific requirements for clearances and materials:
Clearance Requirements
- Wood-burning fireplaces: Typically require 6-12 inches of clearance between the firebox opening and combustible materials like wood
- Gas fireplaces: Generally require 2-6 inches of clearance, but always follow the manufacturer's specifications
- Electric fireplaces: Usually don't generate enough heat to require specific clearances, but follow manufacturer guidelines
- Ethanol fireplaces: Typically require 4-8 inches of clearance from combustible materials
Critical Safety Warning
Always check your local building codes and the manufacturer's specifications for your specific fireplace model before installing a surround. Improper clearances can create serious fire hazards. When in doubt, consult with a professional or your local building department.
Material Selection for Safety
Choose materials appropriate for your fireplace type. Non-combustible materials like stone, brick, tile, or metal are always safe options. If using wood or other combustible materials, ensure proper clearances and consider adding a layer of fire-resistant material like cement board between the fireplace and the wood surround.
Ventilation Considerations
Ensure your surround doesn't interfere with proper ventilation of your fireplace. This is particularly important for vented fireplaces and ventless fireplaces, which have specific requirements for air flow. Never block vents or air intakes with your surround installation.
Maintaining Your DIY Fireplace Surround
Proper maintenance will keep your fireplace surround looking great for years to come. Here are some essential maintenance tips based on your surround material:
Wood Surrounds
- Dust regularly with a soft cloth to prevent buildup
- Inspect annually for signs of heat damage, cracking, or peeling finish
- Touch up or refinish every 3-5 years, depending on use and exposure
- Consider applying a heat-resistant finish for added protection
Stone and Brick Surrounds
- Clean annually with a stone-specific cleaner to remove soot and discoloration
- Reseal natural stone every 1-2 years to prevent staining
- Inspect mortar joints annually and repair any cracks or deterioration
- For more detailed information, see our guide to cleaning fireplace brick and stone
Tile Surrounds
- Clean tiles regularly with a non-abrasive cleaner
- Inspect grout lines annually and reseal as needed
- Replace any cracked or damaged tiles promptly to prevent moisture issues
- For detailed instructions, check our DIY fireplace tile guide
Common DIY Mistakes to Avoid
Learning from others' mistakes can save you time, money, and frustration. Here are the most common pitfalls to avoid when building your fireplace surround:
- Inaccurate Measurements: Always measure twice (or three times!) before cutting. A small measurement error can compound into a major installation problem.
- Ignoring Clearance Requirements: Failing to maintain proper clearances from the firebox is not just a mistake—it's a serious safety hazard.
- Skipping the Level Check: Even slightly off-level installations look unprofessional and can cause functional issues with doors or other components.
- Using Inappropriate Fasteners: Standard drywall screws may not hold up to the heat near a fireplace. Use heat-resistant fasteners where necessary.
- Rushing the Finish Work: Proper sanding, priming, and finishing takes time but makes a huge difference in the final appearance.
- Neglecting to Account for Expansion: Materials expand and contract with temperature changes. Leave small gaps where needed to prevent buckling or cracking.
- Not Planning for Future Maintenance: Design your surround with access points for future maintenance of the fireplace or surrounding components.
Frequently Asked Questions About DIY Fireplace Surrounds
How long does it take to build a DIY fireplace surround?
Most DIY fireplace surround projects can be completed in a weekend (2-3 days), with the actual installation taking 6-12 hours and finishing (sanding, painting, etc.) requiring additional time. More complex designs or materials like stone may take longer.
Can I install a surround on any type of fireplace?
Yes, but the materials and clearances required will vary based on your fireplace type. Electric fireplaces offer the most flexibility since they generate minimal heat, while wood-burning fireplaces require the most careful consideration regarding heat resistance and clearances.
Do I need a permit to install a fireplace surround?
In most jurisdictions, installing a decorative surround that doesn't alter the fireplace's structural or venting components doesn't require a permit. However, always check with your local building department to be certain, especially if you're making any modifications to the fireplace itself. For more information, see our guide on fireplace permit requirements.
What's the most budget-friendly material for a DIY surround?
MDF or painted plywood is the most budget-friendly option, typically costing $100-$300 for materials. However, these materials are only suitable for electric fireplaces due to their limited heat resistance. For fireplaces that generate significant heat, basic wood options like pine offer the best balance of cost and safety.
Can I install a surround over an existing one?
In many cases, yes, but it depends on the condition and material of the existing surround. If the existing surround is in good condition and provides adequate heat protection, you can often install a new surround over it. However, if there are any signs of damage, moisture issues, or improper installation, it's best to remove the old surround first.
Final Tips for a Successful DIY Fireplace Surround Project
- Start with a Detailed Plan: Sketch your design with precise measurements before purchasing any materials. This will help you avoid costly mistakes and ensure all components fit together properly.
- Choose Materials Appropriate for Your Fireplace Type: Always prioritize safety by selecting materials that can withstand the heat output of your specific fireplace.
- Invest in Quality Tools: Good tools not only make the job easier but also result in a more professional finish. If you don't own the necessary tools, consider renting them instead of buying lower-quality options.
- Take Your Time with Finishing: The finishing process (sanding, priming, painting) is where many DIY projects fall short. Invest adequate time in these steps for professional-looking results.
- Consider the Overall Design Context: Your surround should complement not just the fireplace but the entire room. Consider how it will work with your fireplace wall design, room architecture, and existing decor.
- Don't Be Afraid to Ask for Help: Some steps, particularly lifting heavy materials or holding pieces in place during installation, are much easier with a second pair of hands.
- Document Your Process: Take photos throughout the project. This creates a record of your work and can be helpful for future maintenance or if you decide to tackle another DIY fireplace project.

Building your own fireplace surround is a rewarding project that can dramatically transform the look of your room while saving you significant money compared to professional installation. With proper planning, the right materials, and attention to detail, you can create a custom surround that becomes the focal point of your space and a source of pride for years to come.


