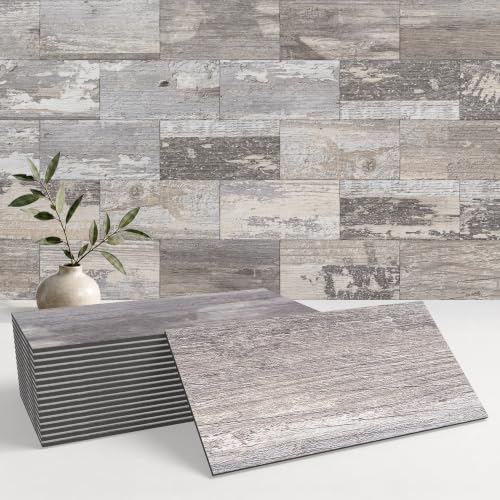
Stick on Tiles for Fireplace Surround
A complete guide to peel-and-stick fireplace tiles — installation, durability, design options, and whether this DIY solution is right for your home
START READINGWhy stick on tiles? A fireplace surround defines the entire look of your hearth. Traditional tile installation requires thinset, grout, and professional labor. Peel-and-stick tiles offer a dramatically simpler path — no mortar, no grout lines to seal, and no specialized tools. But are they durable enough for a heat-exposed surface? This guide answers that question and everything else you need to know before choosing this material for your fireplace makeover.
What Are Stick on Tiles for a Fireplace Surround?
Stick on tiles — also called peel-and-stick tiles or self-adhesive tiles — are thin, lightweight panels with a pressure-sensitive adhesive backing. They are designed to bond directly to a smooth, clean substrate without mortar or grout. Originally popular for kitchen backsplashes and rental apartment upgrades, they have expanded into fireplace surround applications as manufacturers developed heat-resistant formulations.
Most stick on tiles are made from one of three materials: vinyl (PVC), PET, or peel-and-stick stone/mosaic composites. Each has different heat tolerances and visual qualities. For a fireplace surround, the critical specification is the manufacturer's stated maximum temperature rating. If you are exploring broader surround material options, our guide on types of stone for fireplace surround covers natural and engineered alternatives.
Unlike traditional ceramic or porcelain tile, stick on tiles are not cemented into place. This means they can be removed with heat and effort, making them appealing for renters or anyone testing a design before committing to a permanent renovation.
How Stick on Tiles Work on a Fireplace
The adhesive backing activates when you press the tile firmly against a clean surface. Most products use an acrylic or silicone-based adhesive that grips smooth substrates such as painted drywall, plywood, metal, or existing tile. The bond strengthens over the first 24–72 hours as the adhesive cures.
For fireplace surrounds, the key difference from a backsplash is heat. The surround itself — the area around the firebox, not inside it — experiences elevated temperatures but rarely the direct flame contact of the firebox interior. Stick on tiles rated for 120°F to 200°F (49°C to 93°C) are generally suitable for the surround zone, provided the fireplace is properly vented and the manufacturer's instructions are followed.
Pros and Cons of Stick on Tiles for Fireplace Surrounds
✅ Advantages
- No mortar, grout, or specialized tools required
- Installation in hours rather than days
- Removable if you change your mind
- Ideal for renters and temporary upgrades
- Wide range of styles: marble, subway, stone, geometric
- Lower upfront material cost than traditional tile
- No grout lines means easier cleaning
❌ Limitations
- Not as durable as cement-set tile long-term
- Adhesive can fail under prolonged high heat
- Surface must be perfectly smooth and clean
- Limited thickness and texture compared to real stone
- May peel at edges in humid or fluctuating conditions
- Not suitable for firebox interiors
- Fewer custom sizing options than cut tile
Step-by-Step Installation Guide
Installing stick on tiles on a fireplace surround is a manageable DIY project. Follow these steps for the best adhesion and a professional-looking result.
Prepare the Surface
Remove any existing loose paint, dust, or debris. Wipe the surround with a degreaser and let it dry completely. The surface must be smooth — fill any cracks or uneven areas with patching compound and sand flush. Porous surfaces may need a primer coat to help the adhesive bond.
Measure and Plan the Layout
Measure the width and height of the surround area. Dry-fit your tiles before peeling any backing. Plan the layout so cut edges land in less visible areas — corners or the bottom edge. For a balanced look, center the pattern and work outward.
Cut Tiles to Size
Most vinyl and PET tiles can be cut with heavy-duty scissors or a utility knife. For precise edges around the firebox opening, score the tile with a straight edge and snap it, or use a craft knife. Always cut with the backing still on to prevent the adhesive from gumming up your blade.
Peel and Press
Peel the backing away a few inches at a time. Align the tile carefully — the adhesive grabs quickly. Press firmly from the center outward to push out air bubbles. Use a wallpaper seam roller or a clean cloth to apply even pressure across the entire tile.
Work in Sections
Install tiles in small sections rather than trying to place all of them at once. This keeps the layout aligned and reduces the risk of misplacement. If a tile is slightly off, you can usually lift it carefully and reposition within the first few minutes.
Finish Edges and Cure
For exposed edges, use a trim piece or edge molding designed for tile. After installation, press all tiles once more and let the adhesive cure for 24–72 hours before exposing the surround to heat. Avoid cleaning the surface with harsh chemicals during the curing period.
Stick on Tiles vs. Traditional Fireplace Tile
How does the peel-and-stick approach compare to conventional ceramic or stone tile installation? This table summarizes the key differences.
| Factor | Stick on Tiles | Traditional Tile |
|---|---|---|
| Installation Method | Peel-and-stick adhesive | Thinset mortar + grout |
| Skill Level | Beginner-friendly DIY | Intermediate to professional |
| Time Required | 2–6 hours for typical surround | 1–3 days including curing |
| Durability | Good for decorative surrounds; limited lifespan under high heat | Excellent; decades with proper installation |
| Removability | Removable with heat and effort | Permanent; requires demolition |
| Heat Tolerance | Depends on material; verify rating | High; ceramic and stone handle heat well |
| Cost Tier | Budget-friendly to mid-tier | Mid-tier to premium depending on material |
| Best For | Rentals, quick makeovers, temporary designs | Permanent installations, high-traffic hearths |
Design Ideas for Stick on Tile Fireplace Surrounds
The style range of peel-and-stick tiles has expanded significantly. Here are popular looks that work well on a fireplace surround:
- Subway tile: Classic white or colored 3×6 inch layout for a clean, timeless look.
- Marble-look vinyl: Veined patterns that mimic Carrara or Calacatta marble without the weight.
- Geometric patterns: Hexagon, herringbone, or chevron designs for a modern statement.
- Faux stone: Textured panels that replicate stacked stone or ledgestone.
- Solid matte colors: Black, charcoal, or deep green for a contemporary, minimalist feel.
- Metallic finishes: Brushed nickel or copper tones for an industrial or glam aesthetic.
For more surround inspiration, explore DIY fireplace surround for electric fireplace and contemporary stone fireplace surround ideas. If you are planning a larger makeover, DIY fireplace makeover covers full transformations.
Where Stick on Tiles Work Best on a Fireplace
Not every part of a fireplace is suitable for adhesive tiles. Here is a practical breakdown:
✅ Suitable Areas
- The surround frame around the firebox
- Hearth face (vertical front, not the top surface)
- Wall area above the mantel (if heat is low)
- Electric fireplace surrounds (low heat output)
- Decorative columns or leg areas
❌ Avoid These Areas
- Inside the firebox
- Directly above an open wood or gas flame
- Hearth floor where hot embers may land
- Any surface exceeding the tile's heat rating
- Outdoor fireplaces exposed to weather
Maintaining Stick on Tile Surrounds
Peel-and-stick tiles are low-maintenance but not maintenance-free. Clean them with a soft cloth and mild soapy water. Avoid abrasive scrubbers, which can dull the finish or lift edges. If an edge begins to peel, apply gentle heat with a hair dryer, press the tile back down, and hold for 30 seconds.
Inspect the surround seasonally, especially before winter. Heat cycles can gradually weaken the adhesive. For broader fireplace care, see our fireplace maintenance hub and seasonal fireplace checklist.
Frequently Asked Questions
It depends on the material and the manufacturer's rating. Many vinyl and PET peel-and-stick tiles are rated for temperatures up to 120°F–150°F (49°C–65°C), which is sufficient for the surround of an electric or properly vented gas fireplace. However, they are not suitable for the firebox or for direct flame contact. Always check the product's heat rating and never exceed it.
Yes, but the surface must be smooth. Brick and textured tile have uneven surfaces that prevent full adhesive contact. You would need to apply a skim coat of patching compound or a smooth backer board first. For painted surfaces, ensure the paint is firmly adhered and clean. Our guide on DIY fireplace tile covers surface preparation in detail.
With proper installation and moderate heat exposure, quality peel-and-stick tiles can last several years. In high-heat or high-humidity conditions, the adhesive may degrade faster, leading to peeling edges. They are best viewed as a medium-term decorative solution rather than a permanent structural finish.
Yes — electric fireplaces are an excellent application because the surround typically stays much cooler than wood or gas units. The heat is usually localized to the heater vent, not the decorative surround. Just keep the tiles away from the immediate vent area and follow the product's temperature guidelines.
Apply gentle heat with a hair dryer or heat gun on a low setting to soften the adhesive. Starting at a corner, slowly peel the tile back at a low angle. Residue can be removed with a commercial adhesive remover or warm soapy water. Avoid pulling too fast, which can damage the underlying surface.
They are one of the most renter-friendly options available, provided your lease allows modifications. Because they are removable and do not require drilling or permanent adhesive, they let you customize a fireplace surround without losing a security deposit. Always test a small inconspicuous area first to ensure the adhesive does not damage the existing finish. See apartment fireplace installation for more rental-friendly ideas.
Ready to Transform Your Fireplace Surround?
Browse our recommended peel-and-stick tile products below and find the perfect match for your hearth.
VIEW RECOMMENDATIONSContinue Exploring
If you are planning a broader fireplace update, these guides will help you make informed decisions:
- Fireplace Buying Guide — everything to consider before purchasing
- DIY Fireplace Tile — full tile installation walkthrough
- DIY Fireplace Makeover — complete transformation ideas
- DIY Fireplace Surround for Electric Fireplace — custom surround builds
- Fireplace Tile Ideas with Wood Mantel — pairing tile and wood
- Floor to Ceiling Fireplace Tile Ideas — dramatic full-wall designs
- Arts and Crafts Style Fireplace Tiles — period-inspired patterns
- Painting Stone Fireplace Before After — alternative makeover approach