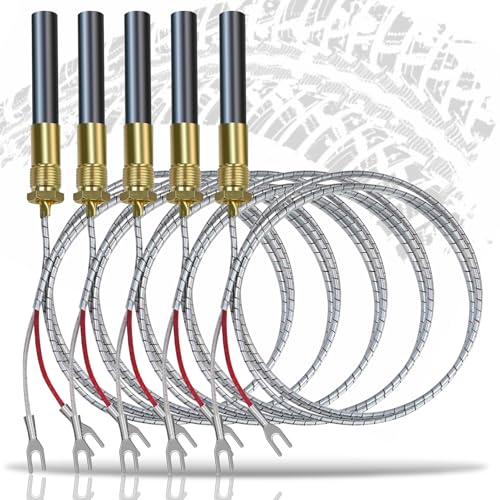
Replacing the Thermocouple on a Gas Fireplace
A complete step-by-step guide to diagnose, replace, and test your gas fireplace thermocouple – save on service calls and restore safe heating.
Why Your Gas Fireplace Won't Stay Lit
If your gas fireplace pilot light keeps going out or won't stay lit, the thermocouple is often the culprit. This small but critical safety device detects whether the pilot flame is burning and signals the gas valve to stay open. When it fails, the gas valve closes as a safety measure, preventing gas from flowing.
Replacing the thermocouple is one of the most common gas fireplace maintenance tasks. It's a straightforward DIY project that can save you on service fees. This guide covers everything you need to know, from diagnosis to installation and testing.
⚠️ Safety First: Working with gas appliances carries inherent risks. If you smell gas at any point, evacuate immediately and call your gas company. This guide is for informational purposes – if you're uncomfortable with any step, hire a qualified professional.
Signs Your Thermocouple Needs Replacement
Before you start shopping for a replacement part, confirm that the thermocouple is actually the problem. Here are the most common symptoms:
- Pilot light won't stay lit – You hold the pilot button, the flame lights, but goes out as soon as you release the button.
- Intermittent operation – The fireplace works for a while, then shuts off unexpectedly.
- Weak pilot flame – The flame is small or yellow instead of a strong blue flame.
- Delayed ignition – It takes longer than usual for the pilot to ignite.
If you're experiencing these issues, a faulty thermocouple is highly likely. However, also check for other potential causes like a clogged pilot orifice or dirty thermopile before proceeding.
What You'll Need
Before starting, gather these tools and parts. Most items are readily available at hardware stores or online.
Tools Required
Replacement Part
Thermocouple: These are universal but come in different lengths (typically 18", 24", 30", 36"). Measure your existing one or check your fireplace manual. Quality replacement thermocouples are widely available at entry-level pricing.
For specific models, you can use the replacement parts guide to find the right fit. Always verify compatibility with your gas valve manufacturer.
Step-by-Step Replacement Guide
Follow these steps carefully. The entire process typically takes 30–45 minutes for a first-timer.
Locate the gas shutoff valve near your fireplace and turn it to the "OFF" position. Wait at least 5 minutes to allow any residual gas to dissipate. This is a critical safety step – never skip it.
Remove the fireplace front panel and logs. The pilot assembly is usually visible once the decorative media is moved. Take a photo of the setup before disconnecting anything – this will help with reassembly.
For more detailed removal instructions, see our fireplace installation guide for general orientation on accessing the burner area.
Using a wrench, loosen the nut connecting the thermocouple to the gas valve. Then, detach the bracket holding it in place next to the pilot flame. Carefully pull it out.
Important: Don't bend or damage other components like the pilot tube or spark igniter.
Insert the new thermocouple into the same position as the old one. Make sure the tip is positioned directly in the pilot flame path – about 1/8" above the flame is ideal. Secure it with the bracket.
Connect the other end to the gas valve and tighten the nut firmly (but don't over-tighten – use hand-tight plus 1/4 turn).
While everything is open, take the opportunity to clean the pilot burner and orifice. Use a wire brush to remove any carbon buildup and a vacuum to clear debris. A clean pilot ensures proper flame contact with the new thermocouple.
For deeper cleaning tips, check our gas fireplace burner cleaning guide.
Turn the gas supply back on. Press and hold the pilot button while lighting the pilot. Once lit, continue holding the button for 30–60 seconds to heat the thermocouple. Release the button – the pilot should stay lit. If it does, you've successfully fixed the issue.
If the pilot goes out again, the thermocouple may need more time to heat up, or the positioning may need adjustment.
Replacement Investment Tiers
DIY Tier: Entry-Level (thermocouple only)
Professional Service Tier: Mid-Range (parts + labor + trip charge)
Your Savings: Significant by doing it yourself
If you're considering other fireplace upgrades, our fireplace investment tier breakdown covers installation and replacement tiers for different fireplace types. For a broader comparison of repair options, see the fireplace maintenance investment guide.
Common Mistakes to Avoid
- Incorrect positioning: The thermocouple tip must be fully engulfed by the pilot flame. If it's only partially in the flame, it won't generate enough voltage to keep the gas valve open.
- Over-tightening the fitting: This can strip threads or damage the gas valve. Use gentle pressure and stop when snug.
- Using the wrong length: Too short and it won't reach the bracket; too long and it may bend or kink. Match your existing thermocouple length.
- Skipping the cleaning step: A dirty pilot burner can cause flame issues that mimic a bad thermocouple. Always clean while you're in there.
- Not testing thoroughly: After installation, test the fireplace in all modes to ensure proper operation before closing everything up.
For more troubleshooting help, visit our fireplace troubleshooting hub for common issues with gas, electric, and wood fireplaces.
When to Call a Professional
While replacing a thermocouple is DIY-friendly, some situations require a licensed technician:
- You smell gas or suspect a leak anywhere in the system
- The gas valve itself appears to be faulty (thermocouple replacement doesn't solve the issue)
- You're unsure about working with gas connections
- Your fireplace is under warranty – DIY repairs might void it
- You notice damage to gas lines or other components
If you decide to call a professional, our gas fireplace installation requirements page can help you understand what to expect from a service visit.
Frequently Asked Questions
How long does a gas fireplace thermocouple last?
Typically 5–10 years depending on usage and environmental conditions. High humidity, dust, or frequent use can shorten its lifespan.
Can I replace a thermocouple without turning off the gas?
No – you must turn off the gas supply at the shutoff valve before any work. This is non-negotiable for safety.
Is a thermocouple the same as a thermopile?
No. A thermocouple uses a single junction and generates around 20–30 millivolts, typically used for pilot safety. A thermopile has multiple junctions and generates more voltage (up to 750 millivolts) to operate the main gas valve.
Why does my pilot light keep going out after replacing the thermocouple?
Possible causes include: thermocouple not fully in the flame, a blocked pilot orifice, low gas pressure, or a faulty gas valve. If you've confirmed correct positioning and cleaned the pilot, consider other troubleshooting steps.
Can I use any universal thermocouple for my gas fireplace?
Most universal thermocouples work with standard gas valves, but always check your fireplace manual or the manufacturer's specifications. Length and thread type (typically 1/8" NPT or 9/16" UNF) are the main compatibility factors.
Is it worth converting my wood-burning fireplace to gas instead of repairing?
If your gas fireplace is old and frequently breaking down, you might consider converting to a gas insert or upgrading. However, if it's a simple thermocouple replacement, it's far more economical to just fix it.
Final Tips for Success
- Take photos before disconnecting anything – this is invaluable for reassembly.
- Use the right tools – cheap wrenches can slip and damage fittings.
- Test thoroughly – after reassembly, run the fireplace for at least 20 minutes to ensure stable operation.
- Keep it clean – annual maintenance, including cleaning the pilot assembly, will extend the life of your new thermocouple.
- Consider a service plan – some utility companies offer annual maintenance packages that include thermocouple inspection and replacement.
For more fireplace maintenance information, explore our maintenance schedule guide and seasonal checklist.